Air Layering
Propagate bougainvillea by air layering: a reliable method for woody stems. Higher success than cuttings, true-to-type clones, faster blooms.
Overview
Air layering is a propagation technique that encourages a stem to form roots while it remains attached to the parent plant. For bougainvillea growers, it solves two common frustrations: poor rooting from cuttings and the long wait for young plants to mature. Instead of cutting a branch and hoping it survives, you wrap a wounded section of stem with moist sphagnum moss and plastic. Roots develop inside the moss over several weeks, and only then do you sever the new plant.
Why does this matter for bougainvillea? Bougainvillea stems are woody and often reluctant to root from standard cuttings, especially cultivars with thick bark or those grown in cooler climates. Air layering bypasses the typical failure points: the stem never wilts because it's still fed by the mother plant, and the rooting environment stays consistently moist. Nursery owners and collectors rely on air layering to propagate special varieties like 'Golden Jackpot' or 'Blueberry Ice' that are nearly impossible from cuttings.
For home gardeners, air layering feels intimidating at first, but the process is straightforward. You need a sharp knife, sphagnum moss, rooting hormone, and clear plastic wrap. Within two to three months, you'll have a rooted plant ready for its own pot. This article walks through every step with the kind of practical detail you'd get from standing next to an experienced propagator.
Quick Facts
| Factor | Details |
|---|---|
| Best season | Late spring to early summer when temperatures are reliably above 21°C (70°F) |
| Success rate (typical) | 80–95% on healthy, actively growing wood |
| Time to root | 6 to 12 weeks depending on cultivar, temperature, and stem thickness |
| Ideal stem diameter | 0.5–1.5 cm (pencil to finger thickness) |
| Minimum temperature for rooting | 20°C (68°F); below this, root initiation slows dramatically |
| Rooting hormone concentration | 0.3% to 0.8% IBA (indole-3-butyric acid) – powder or gel |
| Time from separation to first bloom | Often 3–6 months if the air layer came from mature wood |
| Difficulty level | Moderate – requires patience and attention to moisture, not advanced skill |
Identification and Characteristics
Recognizing a good candidate for air layering is as important as the technique itself. Bougainvillea stems that work best are semi-hardwood: current or previous season's growth that has started to turn brown but still bends slightly. They should not be soft, green tips (too succulent, prone to rot) nor old, corky branches (poor cambium activity).
Visual signs of a suitable stem: The bark is light brown to gray-brown. Leaves are fully expanded and healthy, with no signs of pests or disease. Nodes are spaced 2–5 cm apart. The stem diameter is uniform, without scars or bulges. Avoid stems with flowers or flower buds; they divert energy from root formation.
How a healthy air layer develops: Within two to three weeks, you'll see a white callus at the upper edge of the wound. That's the plant producing undifferentiated cells that will become roots. By week four to six, small white root tips push into the moss. As roots mature, they turn cream then light brown and become thick and branched. A successful layer has at least a dozen roots, each several centimeters long, before separation.
Distinguishing normal from problematic development: Clear, sticky sap around the wound is normal – it's the plant's natural resin. A small amount of darkening on the cut surface is fine as long as it doesn't spread. However, black or mushy tissue, foul odor from the moss, or roots that are brown and slimy indicate rot. Wilting leaves on the stem above the layer suggest the girdle was too deep or the ties are too tight, cutting off water flow.
Why It Happens or Why It Matters
Air layering works because it exploits the plant's natural wound response. When you remove a ring of bark (girdling), you interrupt the downward flow of auxins and carbohydrates. These compounds accumulate above the wound and stimulate root formation. Meanwhile, water and minerals continue moving upward through the xylem, keeping the stem alive. The moist moss provides an ideal environment for root initials to emerge.
Biological causes of successful rooting: The removal of the phloem (inner bark) prevents sugars produced in the leaves from reaching the roots below. Trapped above the girdle, these sugars fuel the development of adventitious roots. This is the same principle behind mound layering and simple layering, but air layering works for branches that can't be bent to the ground.
Environmental factors that influence success: Temperature is the biggest variable. Bougainvillea roots form fastest when the air temperature around the moss ball stays between 24°C and 29°C (75–85°F). Humidity inside the plastic wrap should be near 100%, but the surrounding air should have good circulation to prevent fungal problems on the rest of the plant.
Climate influences: In tropical lowlands, air layering works almost year-round, but the wet season can cause mold if you don't add ventilation holes. In Mediterranean climates, spring and early summer are ideal; autumn layers often stall because nights cool down. In temperate zones with cold winters, air layering is only practical in a greenhouse or indoors near a bright window.
Seasonal influences: Start air layers when the plant is actively growing. For most bougainvillea, that's after the last frost and before the hottest part of summer. In warm climates, a second window opens in early autumn, but roots develop slower. Avoid layering during winter dormancy – the plant won't invest energy in new roots.
Practical Application for Bougainvillea Growers
Follow this step-by-step process. I've used it on hundreds of bougainvillea in a commercial nursery setting, and these details make the difference between frustration and reliable success.
Tools and Materials
- Sharp, sterilized grafting knife or box cutter with a new blade
- Sphagnum moss (not peat moss) – soak in water for at least 2 hours, then squeeze until damp like a wrung-out sponge
- Rooting hormone containing IBA at 0.3% to 0.8% (gel is easier to control)
- Clear polyethylene plastic wrap – 4 to 6 inches wide
- Twist ties, soft plant ties, or electrical tape (stretchable)
- Aluminum foil (optional, for blocking light and insulating)
- Rubbing alcohol and a cloth for sterilizing between cuts
- Spray bottle with water
Step 1: Select the Branch
Choose a stem that is healthy, pest-free, and receives some sunlight but not harsh afternoon exposure. The section you'll wrap should be at least 30 cm (12 inches) from the branch tip, leaving enough leaves above to support the layer. Mark the spot where the bark is smooth and the stem diameter is consistent.
Step 2: Make the Girdle
About 30–45 cm from the tip, remove a 2.5 cm (1 inch) ring of bark. Make two parallel cuts around the stem, then connect them with a vertical cut. Peel off the bark carefully using the knife edge or your fingernail. You should see smooth, pale green or white wood underneath. Scrape this surface lightly with the knife to remove any remaining cambium (the thin, slimy layer just under the bark). This scraping is critical – if any cambium remains, the plant will bridge the wound and roots won't form.
Step 3: Apply Rooting Hormone
Dust or brush rooting hormone onto the upper edge of the wound and the exposed wood. With powder, dip the area or use a small paintbrush. With gel, squeeze a bead along the wound and spread it. Tap off excess powder; gel doesn't need tapping.
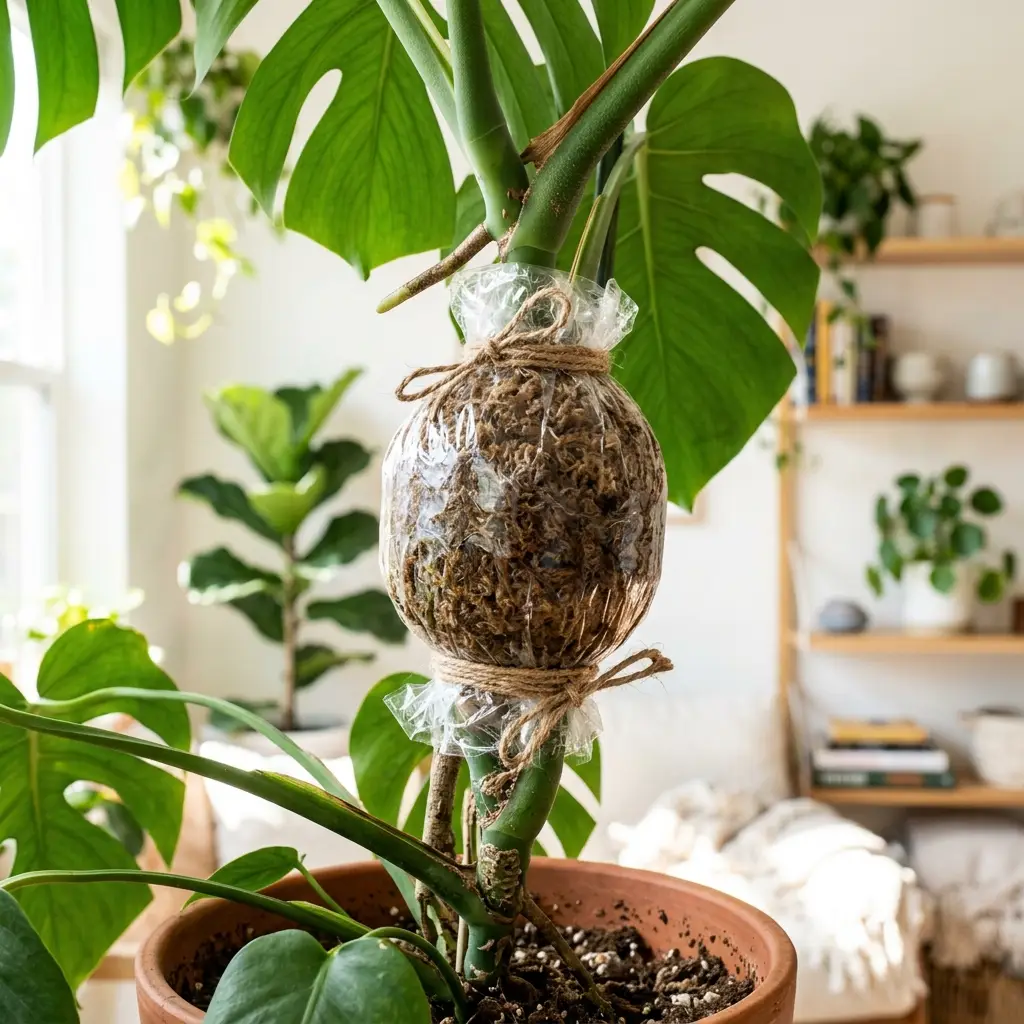
Step 4: Wrap with Moss
Take a handful of pre-soaked, squeezed sphagnum moss and form it into a ball around the wound. The ball should be about the size of a large golf ball for a pencil-thick stem – roughly 7–10 cm in diameter. Cover the wound completely plus about 1 cm above and below. The moss should be damp but not dripping; squeeze harder if water runs out.
Step 5: Seal with Plastic
Wrap clear plastic tightly around the moss ball, overlapping the edges. Secure it above and below the ball with twist ties or tape. Don't overtighten – you want a snug seal, but crushing the stem will kill the branch. Clear plastic lets you check root progress without unwrapping.
Step 6: Cover with Foil (Optional but Recommended)
Wrap aluminum foil loosely over the plastic. Roots form best in darkness, and foil also prevents the moss from overheating in direct sun. In hot climates, use white plastic or reflective foil.
Step 7: Monitor and Maintain
Check the layer weekly. Gently squeeze the moss ball through the foil to feel for moisture. If it feels dry or the plastic has no condensation, unwrap the foil and inject water using a syringe or carefully untie the top and mist. Rewrap immediately. If you see mold or black patches on the moss through the plastic, poke a few tiny holes with a pin for ventilation.
Step 8: Wait for Roots
Resist the urge to peek inside for at least 4 weeks. After that, you can gently squeeze to feel firmness – that's roots. To see them, carefully peel back a corner of the plastic. Look for white or light brown roots that are at least 2–3 inches long and starting to branch. If you only see small nubs, re-cover and wait another 2–4 weeks.
Step 9: Sever and Pot
Once a good root mass has formed, cut below the moss ball with clean pruners. Remove the plastic and foil carefully, trying not to break roots. Pot the layer into a container with drainage holes, using a mix of 50% potting soil, 25% perlite, and 25% coarse sand. The root ball should be at or just below the soil surface. Water gently and place in bright indirect light for 2 weeks, then gradually move to morning sun. Do not fertilize for the first 4–6 weeks.
Common Mistakes
- Using dry or old moss. Sphagnum that hasn't been properly soaked repels water. Old moss from previous projects often contains fungal spores. Always start with fresh moss and squeeze it to the correct moisture level.
- Not removing the cambium completely. A thin green layer left on the wood will allow the bark to reconnect, and roots never form. Scrape thoroughly after girdling.
- Making the girdle too narrow. Less than 1.5 cm can heal over. Use a full 2–2.5 cm ring.
- Wrapping the moss too loosely. Air pockets dry out the wound and prevent root contact. Pack the moss firmly but not so tight that you compress it into a solid lump.
- Over-tightening ties. This can girdle the stem above or below the layer, causing the branch to die. Secure just enough to hold the plastic in place.
- Checking roots too frequently. Every time you unwrap, you disturb the humidity and temperature, and you risk breaking fragile root tips. Be patient – once a week for moisture checks is plenty.
- Separating too early. Tiny white root nubs are not enough. Wait until roots are several inches long and have turned light brown. Otherwise, the new plant will wilt and die after potting.
- Potting into a container that's too large. Oversized pots hold excess moisture and can rot the new roots. Use a 15–20 cm (6–8 inch) pot for a typical air layer.
- Fertilizing immediately after potting. Fresh roots burn easily. Use plain water for the first month, then start with half-strength balanced fertilizer.
Expert Grower Insights
Container growing observations: Mother plants in pots are easier to manage because you can move them to a sheltered spot during the layering process. In hot weather, I roll my container mother plants into dappled shade to prevent the moss ball from overheating. One nursery trick: wrap the foil-covered layer with a damp paper towel on extremely hot days to cool it by evaporation.
Tropical climate considerations: In high humidity and heat (above 32°C), the risk of fungal rot increases. Use slightly less water in the moss, and poke 3–4 small holes in the plastic for airflow. Also, choose branches that receive morning sun only – afternoon sun can cook the roots inside the plastic.
Monsoon climate adjustments: Constant rain can cause the plastic to trap too much moisture and encourage mold. Check layers every 3 days during wet spells. If you see water pooling inside the plastic, carefully cut a small slit at the lowest point to drain it, then cover the slit with a piece of breathable tape (like micropore).
Dry climate (arid) techniques: Low humidity accelerates moisture loss from the moss. Wrap an additional layer of plastic, and use a thicker moss ball. Some growers in Arizona add a handful of water-absorbing polymer crystals to the moss to extend time between waterings. Check moisture every 2–3 days.
Winter and cool climate strategies: If you live where temperatures drop below 15°C at night, air layer indoors or in a heated greenhouse. A sunny window works, but you may need to supplement with a heat mat set to 24°C, placed under the pot of the mother plant. Roots will form in 8–12 weeks even in winter, but success is lower – wait for spring if possible.
Nursery production insight: Commercial growers often air layer multiple branches on the same plant. A large, established bougainvillea can support 6–8 layers at once, but remove no more than one-third of the total canopy. Rotate which branches you layer each season to keep the mother plant vigorous.
Collector-level tip for difficult cultivars: Variegated and slow-growing varieties like 'Raspberry Ice' or 'Jamaica White' respond well to a technique called "double girdling." Make the first girdle, then 2 cm above it, make a second girdle. Remove the bark between them. This creates a longer accumulation zone for auxins and can improve rooting by 20–30% on stubborn wood. Also, use fresh sphagnum with a pinch of finely ground charcoal to prevent rot.
What experienced growers observe: The fastest rooting occurs on stems that have been in active growth for at least 2 months after a pruning. Stems that grew during high-nitrogen feeding root poorly because they're soft and succulent. Cut back on nitrogen 4 weeks before layering, and emphasize phosphorus and potassium.
Troubleshooting Guide
| Problem | Likely Cause | Recommended Action |
|---|---|---|
| No roots after 12 weeks; moss is dry | Insufficient moisture during critical period | Rehydrate moss thoroughly. If the wound has callused but not rooted, you can carefully re-cut a fresh wound just below the old one and start over. |
| No roots; moss is wet but no callus | Temperatures too low (below 20°C) | Move the mother plant to a warmer location or add a heat mat. Bougainvillea roots need consistent warmth. |
| Black, slimy roots or dark spots on stem | Fungal or bacterial rot from over-wet moss | Unwrap immediately. Remove all rotten moss. Cut away any infected stem tissue back to healthy wood. Sterilize the area with 3% hydrogen peroxide. Wrap with fresh, slightly drier moss and poke ventilation holes. |
| Leaves above the layer are yellowing and wilting | Girdle too deep (cut into xylem) or ties too tight | Loosen ties. If the stem has been crushed, you may see a constriction. If the damage is minor, the branch might recover. Otherwise, cut below the layer and try to root it as a cutting (low chance but possible). |
| Moss ball has sour, ammonia-like smell | Anaerobic decomposition from stagnant water | Unwrap, discard moss, wash the stem with dilute hydrogen peroxide, and reapply with fresh moss. Use a plastic wrap with small vent holes this time. |
| White fuzzy mold on moss surface | Excess humidity and poor airflow | This is often harmless but can compete with roots. Poke additional vent holes. If extensive, unwrap, remove surface mold, and rewrapped with drier moss. |
| Roots form but die after separation | Transplant shock or underwatering after potting | Keep the new plant in high humidity (cover with a clear plastic bag with holes) for 2 weeks. Water when the top inch of soil dries. No fertilizer for 4 weeks. |
| Callus forms but no root tips | Insufficient rooting hormone or cambium not fully removed | Check for a green bridge. If present, scrape again carefully. Reapply fresh rooting hormone. Ensure temperatures are warm and moss is consistently damp. |
| Branch snaps at the girdle | Stem too thin or girdle too deep for the wood type | Prevention: choose stems at least 0.5 cm thick and avoid brittle, dry wood. If it snaps, you can try to graft the tip, but it's usually lost. |
Frequently Asked Questions
Can I air layer a bougainvillea in winter?
You can, but only if you can keep the mother plant consistently above 20°C (68°F). In unheated greenhouses or outdoors, winter layers almost always fail because the plant is semi-dormant. For cold climates, wait until late spring.
What's the difference between air layering and taking cuttings?
Cuttings are severed from the parent and then rooted in a medium. Air layers root while still attached, so they never wilt. For bougainvillea, air layering has a much higher success rate, especially for woody stems. The downside is it takes longer and you can only produce a few layers per plant at a time.
How long until my air-layered bougainvillea blooms?
Often within 3 to 6 months if you used a mature branch that had previously flowered. The new plant is already mature, so it doesn't go through a juvenile non-flowering phase. In some cultivars, it may take a full season to settle in.
Can I air layer a thornless bougainvillea?
Yes, thornless varieties like 'Miss Alice' root readily with air layering. The technique is identical. Some growers report slightly slower rooting times (an extra 1–2 weeks), but success rates are similar.
Do I need to sterilize my knife between air layers on the same plant?
Yes. Bougainvillea can carry bacterial pathogens that enter through fresh wounds. Wipe your blade with rubbing alcohol or a 10% bleach solution between each cut. This is especially important if you're layering multiple branches.
What rooting hormone works best for bougainvillea air layering?
IBA (indole-3-butyric acid) at 0.3% to 0.8%. Powder is fine but can wash off in wet moss; gel stays in place better. Avoid rooting hormones that contain NAA (naphthaleneacetic acid) as the primary ingredient – it tends to produce excessive callus without roots.
Can I use peat moss instead of sphagnum?
Not recommended. Peat moss decomposes quickly, becomes compacted, and doesn't hold structure. Sphagnum moss remains airy and allows roots to grow through it. Use only long-fibered sphagnum.
My air layer has roots, but they're all on one side of the stem. Is that okay?
Yes, that's common. As long as there are enough roots (at least 6–8 good ones), the plant will be fine. When potting, position the stem so the root mass is centered.
Can I air layer a branch that already has flowers?
It's not ideal. Flowering consumes energy that could go to root formation. If you have no choice, remove all flowers and buds before starting. The success rate may drop by 20–30%.
How many air layers can I take from one bougainvillea in a year?
On a healthy, large plant (1.5 meters or taller), you can take 3–5 layers per year without stressing it. On a small potted plant, limit to 1–2 layers. Allow at least 6 months between layering the same branch.
Related Bougainvillea Topics
- Propagating Bougainvillea from Hardwood Cuttings
- Choosing the Right Rooting Hormone for Bougainvillea
- Ground Layering vs. Air Layering
- Aftercare for Newly Propagated Bougainvillea
- Pruning Bougainvillea to Encourage Rooting Material
- Best Potting Mixes for Young Bougainvillea
- Common Bougainvillea Diseases and Sterilization Techniques
- Grafting Bougainvillea for Multi-Color Specimens
Summary
Air layering is the most dependable method for propagating mature bougainvillea, especially cultivars that resist rooting from cuttings. The process rewards patience and attention to detail. Choose a healthy, pencil-thick stem during active growth. Make a clean 2.5 cm girdle, remove all cambium, apply IBA rooting hormone, wrap with damp sphagnum moss, and seal with plastic. Keep the moss consistently moist and the temperature above 20°C. In 6 to 12 weeks, you'll have a rooted plant ready for its own pot.
For home gardeners, air layering turns a frustrating plant into one you can reliably multiply. For nursery owners and collectors, it's the standard for preserving exact genetic copies of exceptional specimens. If you've tried cuttings with mixed results, I encourage you to try air layering this spring. Start with an easy cultivar like 'Barbara Karst', and once you've seen those white roots fill the moss ball, you'll understand why experienced growers rarely bother with cuttings for woody bougainvillea.
Remember: the mother plant must be healthy and well-fed before you start. Use clean tools. Don't rush to separate – wait until the roots are several inches long and slightly woody. After potting, give the new plant shade and high humidity for two weeks, then gradually introduce it to full sun. With proper care, your air-layered bougainvillea will bloom faster than any cutting-grown plant and be a true clone of its parent.
Related Plants
Plant Guide
21 Jewel Pink Variegated
This 21 Jewel Pink Variegated bougainvillea is valued for its pink with cream or white variegation bracts and its floriferous climber with reliable warm-season colour. In warm tropical and subtropical gardens, it performs as a resilient ornamental climber that rewards full sun, sharp drainage, and a restrained feeding regime with long flushes of colour.
Plant Guide
21 Jewel Pink
This 21 Jewel Pink bougainvillea is valued for its pink to deep rose bracts and its floriferous climber with reliable warm-season colour. In warm tropical and subtropical gardens, it performs as a resilient ornamental climber that rewards full sun, sharp drainage, and a restrained feeding regime with long flushes of colour.
Plant Guide
Bidadari
This Bidadari bougainvillea is valued for its pink to deep rose bracts and its floriferous climber with reliable warm-season colour. In warm tropical and subtropical gardens, it performs as a resilient ornamental climber that rewards full sun, sharp drainage, and a restrained feeding regime with long flushes of colour.
Plant Guide
International Pink
This International Pink bougainvillea is valued for its pink to deep rose bracts and its floriferous climber with reliable warm-season colour. In warm tropical and subtropical gardens, it performs as a resilient ornamental climber that rewards full sun, sharp drainage, and a restrained feeding regime with long flushes of colour.
Plant Guide
Kerala Pink
This Kerala Pink bougainvillea is valued for its pink to deep rose bracts and its floriferous climber with reliable warm-season colour. In warm tropical and subtropical gardens, it performs as a resilient ornamental climber that rewards full sun, sharp drainage, and a restrained feeding regime with long flushes of colour.
Plant Guide
Pink Butterfly
This Pink Butterfly bougainvillea is valued for its pink to deep rose bracts and its floriferous climber with reliable warm-season colour. In warm tropical and subtropical gardens, it performs as a resilient ornamental climber that rewards full sun, sharp drainage, and a restrained feeding regime with long flushes of colour.
Related Articles
Guide
How to Propagate Bougainvillea From Cuttings (Global Guide)
Step-by-step global guide to propagate bougainvillea from cuttings. Compare soil vs water rooting, best warm-season timing, rooting hormone use, and aftercare for high success.
Guide
Step-by-Step Guide to Propagating Bougainvillea
Propagating bougainvillea from cuttings is the most reliable way to clone your favorite plant, especially in Western climates where seasonal temperature swings affect rooting speed. This guide explains the best cutting type, the ideal time of year, and the humidity-and-drainage balance that prevents rot.
Guide
Basic Bougainvillea Care: Complete Global Guide for Vibrant Blooms
Complete global guide to basic bougainvillea care: sunlight (6–8 hours), dry-down watering, pruning for blooms, low-nitrogen fertilizer, and troubleshooting common problems.
Guide
Best Fertilizer for Bougainvillea: Feed for Bracts, Not Leaves (Global Guide)
Global guide to bougainvillea fertilizer: organic vs synthetic, low-nitrogen NPK ratios, feeding schedules for pots and ground, and how to trigger heavy blooms without excess leaf growth.
Guide
How to Make Bougainvillea Bloom: The Sun-Stress-Prune Method (Global Guide)
Global guide to trigger heavy bougainvillea blooms using the sun-stress-prune method: full sun, controlled dry spells, strategic pruning, and low-nitrogen fertilizer.
Guide
How to Water Bougainvillea Without Killing the Bloom Cycle (Global Guide)
Master bougainvillea watering worldwide: use the dry-down method to prevent root rot, trigger heavy blooming, and adjust for pots, ground, and all climates.
Related Calculators & Tools
Calculator
Bougainvillea Grow Bag Size Calculator
Calculate the ideal fabric grow bag volume for massive Bougainvillea growth.
Calculator
Bougainvillea Fertilizer Dosage Calculator
Calculate precise fertilizer dosages to trigger Bougainvillea blooms without burning the roots.
Calculator
Bougainvillea NPK Fertilizer Calculator
Analyze your fertilizer NPK ratio to ensure it promotes Bougainvillea blooms rather than just green leaves.
Calculator
Bougainvillea Potting Mix Calculator
Calculate the exact volumes of perlite, compost, and soil for a fast-draining Bougainvillea mix.
Calculator
Bougainvillea Soil pH Calculator
Calculate amendments to reach the ideal 5.5 - 6.5 pH for Bougainvillea nutrient uptake.
Calculator
Bougainvillea Watering Schedule Calculator
Calculate exactly when to water your Bougainvillea using the proven Dry-to-Bloom method.